Helmut-Fischer Picodentor HM500 for demanding tasks
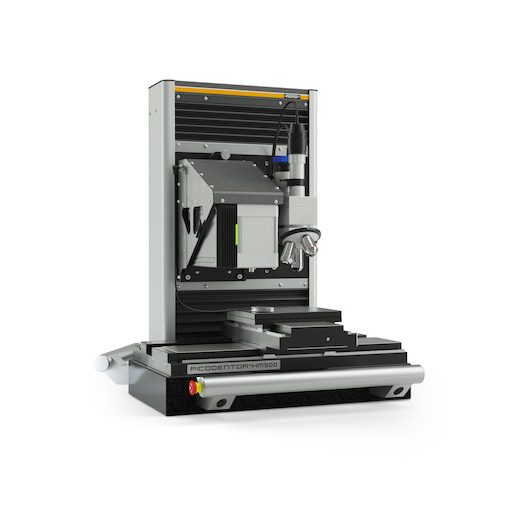
PICODENTOR HM500 is Fischer’s highest performance indentation measurement instrument. Normally, only very elaborate and extremely costly measurement instruments offer similarly high resolution and the corresponding accuracy of force and travel measurement. By contrast, PICODENTOR HM500 combines high-end technology with simple operation. A programmable XY-table, which allows positioning of the samples with an accuracy of ≤0.5µm, makes it suitable for demanding measurement tasks such as the automatic analysis of extremely small measurement areas. The bundled WIN-HCU software not only enables intuitive use of the measurement instruments, it also allows fast and simple determination of numerous material parameters and the dynamic mechanical analysis for small samples.
Features
- Determination of numerous plastic and elastic properties such as indentation hardness (convertible into Vickers hardness), modulus of indentation and creep
- Excellent temperature stability
- Dynamic Mode with oscillating force application
- Measurement and computation of material parameters according to DIN EN ISO 14577-1 and ASTM E 2546
- Indenters: Vickers, Berkovich or carbide ball
- Customer-specific indenters on request
- Microscope with three magnification levels and autofocus for exact positioning of the measuring spot
- Autonomous, highly accurate determination of zero level with fast forwarding
- Programmable XY-precision table (accuracy ≤0.5 µm), active damping table
- Available as an attractive entry-level model (the LIGHT version) with predefined features and positioning accuracy up to ≤2 µm
- Quickly evaluate and clearly present your measurement results with high-performance WIN-HCU software
Applications
- Measurements on extremely small sample areas
- Analysis of ion-implanted surfaces
- Testing of nano layers with sensors
- Matrix effects in alloys
- Measurement of biological materials
- Determination of the plastic and elastic properties on cross-sections
- Dynamic mechanical analysis for small samples
- Accurate long-term measurement
- Measurement of the hardness of bonding wires in the semiconductor industry
- Determination of the abrasion resistance and bondability of connectors
- Mechanical protective coating such as hardness, elasticity and scratch-resistance of multi-layered protective coating on optical glasses and lenses
- Measurement of the hardness and elasticity of PVD, CVD and DLC coatings, as well as chemical nickel layers
- Automated measurements on multiple samples
- Proving the scratch and abrasion resistance of coatings
Accessories
- Heating table SHS200 for tests at raised temperatures
- Atomic force microscope (AFM): record the three-dimensional surface of your sample and measure additional material parameters such as frictional properties
- Specimen holders for different samples
- Sound insulation casing to minimize acoustic influences while measuring at very low loads
For more information visit Helmut Fischer website.
Jus taip pat gali dominti
Helmut-Fischer Fisherscope ST200 for paints and hard material coatings
The FISCHERSCOPE® ST200 is Fischer’s first automatic scratch-test system for…
IšsamiauHelmut-Fischer Fisherscope HM2000 S for mechanical testing
The FISCHERSCOPE HM2000 S is ideally suited for the manual…
IšsamiauHelmut-Fischer Fisherscope HM2000 nanoindentation
FISCHERSCOPE HM2000 is a professional microhardness measurement instrument for the…
Išsamiau


